The following article compares the Thunder Bolt vs Glowforge and was written by our Toronto based support staff Reade Richards. Reade is a published author for Make: media and a user of both Glowforge and Thunder Laser machines.
The latest addition to the Thunder Laser family comes to us in a tabletop package, proving that amazing things can come in all sizes (in this case 37″ x 28.5″ x 19.6″) I’ve already seen a lot of people out there comparing this to other laser cutters, and rightfully so. As a former Glowforge user of 3+ years, I want to share my thoughts on why Thunder Laser’s new machine the is a game changer in terms of desktop laser cutters.
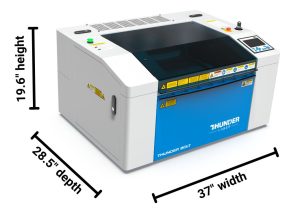
Thunder Bolt vs Glowforge Size Comparison
The first thing I noticed about the Thunder Bolt was the size. Although it’s the smallest in the Thunder Laser product family, it’s a bit more bulky than the Glowforge (38″ x 20.75″ x 8.25″). However, they both occupy roughly the same tablespace.
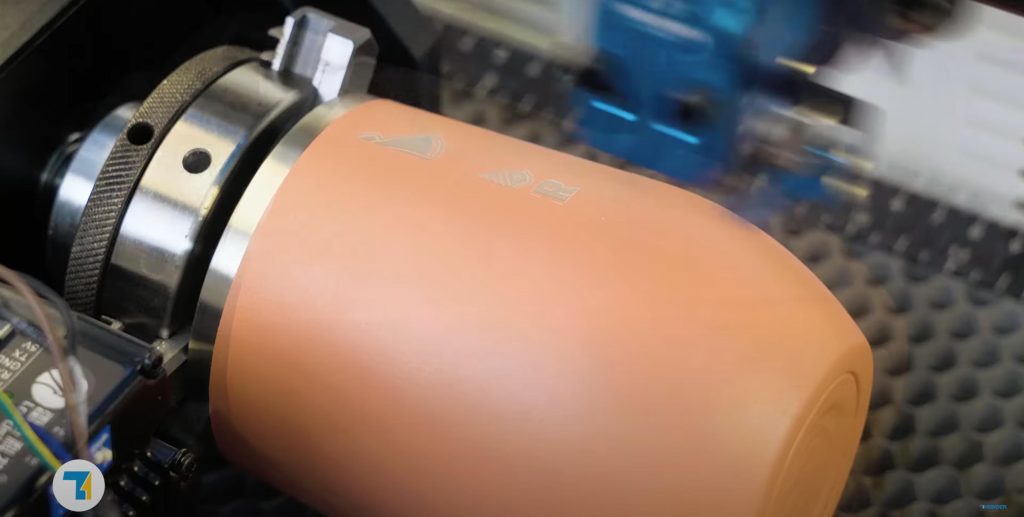
What’s nice about the Thunder Bolt is you get a large work area inside the bed (the 20’’x 12’’ size is quite nice). With this machine, where you really notice the difference is the depth. The Thunder Bolt allows for materials up to 4.3’’, compared to 2’’ of the Glowforge. Not only that, it utilizes an adjustable z axis controlled by 4 ball screw mechanisms like the rest of the Thunder Laser family. I’ve never seen anything like that in other desktop cutters. This means it even has enough room to fit a rotary tool.
(Stay tuned for a special Canadian announcement about this!)
These features attracted me to the Thunder Bolt, because it allows me to experiment with new materials for my creations. I’m particularly excited about the rotary, as this is a game changer if you already have or are looking to start an engraving business. Engraving tumblers, mugs and pint glasses is all the rage these days.
Thunder Bolt vs Glowforge: Laser Comparison
What about the laser itself though? Remarkably more powerful and stable than a Glowforge. While Glowforge uses a 40-45w glass CO2 tube, the Bolt has moved on to a 30w RF (Radio Frequency) tube. Not only is it rare to see a desktop cutter with an RF tube, but also that means you get a higher precision engraving beam.This ALSO means that it cuts faster. Due to the small point size, an RF laser is about 2x more efficient. It’s like cutting with a sharper knife, which means less energy is expended for the same cut. A 30w RF tube has equivalent cutting power of a 50-60w glass tube. It also provides higher resolution engraving.
“At 2000 DPI, it nearly doubles the capability of the Glowforge. You can’t beat that quality with a diode or CO2 laser. And for speed? It’s nearly 8x faster at engraving, with speeds up to 1000mm/s. It’s almost as if Thunder Laser has found a way to shrink a larger laser cutter down for your desktop.”
Thunder Bolt vs Glowforge: Laser Tube Comparison
This relates to a problem that always bothered me with the Glowforge. If you’re familiar with cutters, you know two things about glass tube lasers: they’re delicate, and they need to be cooled. The Glowforge uses a closed liquid loop that uses the air in the room to remove the heat. This does not work so well when your workspace starts to heat up. In my experience, this happens quite often and then you need to wait 10 to 20 minutes until the machine cools off. Not only that, but the placement of the exhaust fan would drag all that hot air over many internal components. This also coats the internal components with particulates.
What caught my eye about the Thunder Bolt was how Thunder Laser solved the stability issue. Using an RF laser tube means the machine is much safer to be moved around, and the internal air pump helps keep the laser and internal components cooled much more efficiently. The rest of the internal components are sectioned off in their own compartments for the most part, and the built in exhaust fan does a much better job of removing any smoke and dust while your cutter is in action. This results in the ability to cut over extended periods of time and a longer lifespan for the cutter itself.
Thunder Bolt vs Glowforge Interface Comparison
The last point I should make is probably the one that frustrated me most with my time on a Glowforge – the connection interface. While Glowforge uses a web interface to access the laser cutter, the Thunder Bolt plugs directly into a computer. This is similar to the larger Thunder Laser machines.
To its credit, Glowforge’s web interface allows users to store, access, and even amend their designs before cutting. This is similar to Thunder Laser’s Ruida controllers. However, this requires an active internet connection to the user’s PC, as well as maintaining a wireless connection to the Glowforge itself.
Admittedly, in my time I rarely had an issue with this, but there was still an approximately 2 minute wait as you uploaded a file to the system, have it wirelessly sent to the cutter. Then, you need to wait for the cutter to path the laser’s movement. When there’s no internet at all, you’re out of luck. Furthermore, a lot of the more useful design and modification tools are locked behind a subscription service. Not a large issue if you design outside of this limited environment, but what happens if this service were ever to be discontinued (looking at you, DREMEL)?
With a Thunder Laser, none of this is required. I’m able to connect via the standard USB or Ethernet cables as with all Thunder Laser models. To me, this was a major selling point. Since I already use Lightburn to design, the process of design to cut is less than a minute. Being able to use the camera to match the Glowforge ‘pick and place’ design functionality directly in my design software helps as well. All the controls for your Thunder Laser are on a touch screen on the front of the machine with all the same functionality you’d find on the larger Thunder Laser models.
My Conclusion
Overall, I’m happy with the upgrade. I loved my glowforge, and as a pandemic project, it really helped me hone in and work on the skills I needed to get me to this point in my maker career. It is an excellent plug-and-play laser machine for entry level users. The size of the machine is great for small workspaces and in home use. But the limitations I talked about above -the lack of adjustable z height, the overheating and connectivity issues- meant that the time had come to upgrade. The Thunder Bolt matches and exceeds the Glowforge’s strengths, and has none of its weaknesses and solves all the problems I had.
The Thunder Bolt is by far the best desktop laser cutter I’ve seen yet, and I look forward to seeing how I can push my skills even further now.


.png "laser cutter Globle") International
International
 United States
 Brasil
 Canada
 Česká
Česká
 Ελλάδα
 Polska
 Ireland
 Portugal
 Lietuva
 Россия
 Deutschland
 Britain
 Україна
 France
 Sverige
 한국
한국
 中国
中国
 ประเทศไทย
 香港
香港
 Israel
 臺灣
臺灣
 India
India
 Australia
 New Zealand
 South Africa