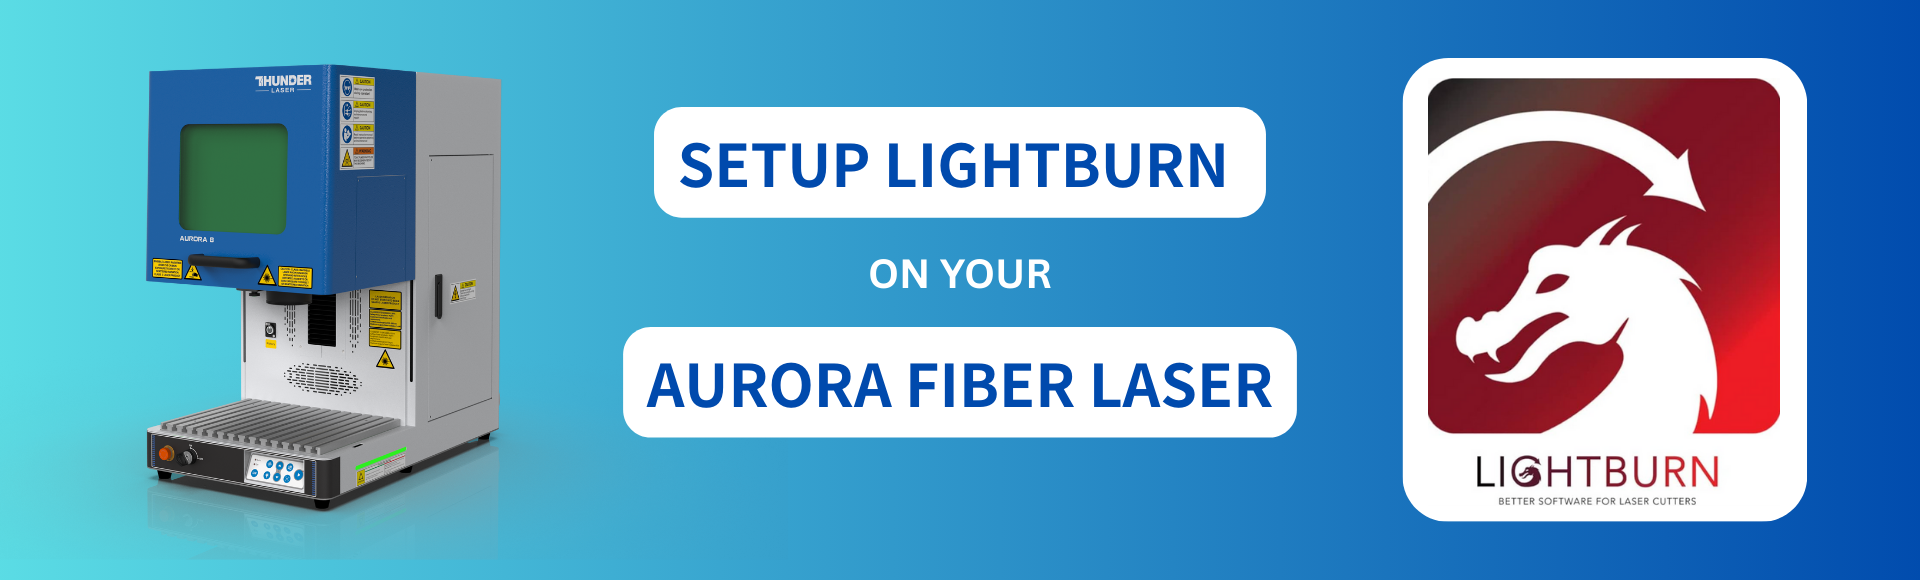
Setup LightBurn on Your Thunder Laser Aurora (Non Pro)
Before you dive into laser cutting, it’s important to set yourself up for success by gathering all the necessary materials and preparing your workspace. Ensuring you have everything on hand—from your laser-safe materials to the proper tools—will help streamline the process and prevent interruptions. A clean, organized work area not only makes the job easier but also enhances safety and efficiency. Taking the time to set up now will save you headaches later and ensure a smooth, hassle-free experience with your laser cutter.
Please Note: This Guide is for Aurora Lite and Aurora 8 (Standard, MOPA, and UV models) If you have an Aurora 8 PRO or MOPA Pro, you will need to refer to your User Manual for installation of EzCad Software
For more on setting up and organizing your workspace for your laser, see this article:
Step 1: Preparing Yourself and the Laser
Before you dive into laser cutting, it’s important to set yourself up for success by gathering all the necessary materials and preparing your workspace. Ensuring you have everything on hand—from your laser-safe materials to the proper tools—will help streamline the process and prevent interruptions. A clean, organized work area not only makes the job easier but also enhances safety and efficiency. Taking the time to set up now will save you headaches later and ensure a smooth, hassle-free experience with your laser cutter
Gather All The Tools You Need
To set up your Thunder Aurora Laser, you’ll need a few key items to ensure everything runs smoothly. This includes the necessary cables, software, and a properly powered-on machine. Before you begin, make sure your laser is turned on and ready for setup, and have the following items handy:
Thunder Laser USB Thumb Drive (This contains all the configuration files you will need to load into Lightburn
Thunder supplied USB-A to USB-C Printer cable
The Computer you will be using to connect your Thunder Aurora
Access to the Internet to download Lightburn Software
Your Laser TURNED ON
Step 2: Downloading Lightburn
Unlike some software that offers separate versions for different types of lasers, Lightburn is a single program that can work with both Gantry (motion-based) and Galvo (scanner-based) laser systems. However, the features you can access depend on the type of license you purchase:
Lightburn Core – This is the base license designed for hobbyists and general users. It supports GCode-based controllers (such as GRBL and Smoothieware) and basic laser functions. It’s best suited for diode and entry-level CO2 lasers. You may already have this if you’re upgrading from diode lasers
Lightburn Pro – THIS IS WHAT YOU NEED – This license unlocks support for more advanced controllers, including DSP-based CO2 laser systems (Ruida, Trocen, etc.) and high-speed Galvo fiber lasers used for metal engraving. It also includes additional features tailored for professional and industrial applications.
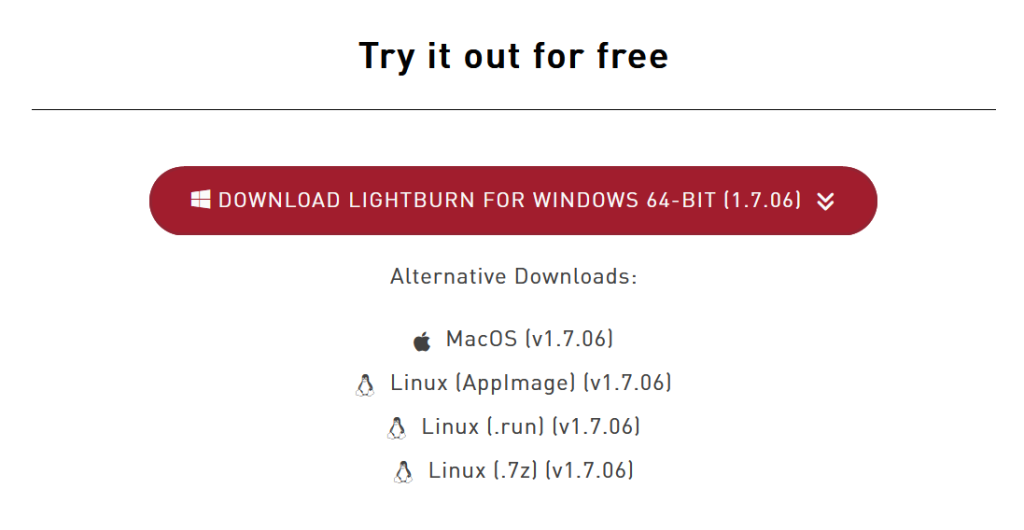
You will need to go to Lightburn’s webpage and grab the installer file if you do not already have a copy. You can download and use a trial version of Lightburn for 30 days before needing to input a License Key. This version of lightburn will have all the same features as the full version
Download The Correct Version For Your OS
On the trial download page, search for the correct version for your computer
Windows 64bit
Windows 32bit
Mac OS
Linux
If you ever need to go back and download an older version of Lightburn, they’ve made is easy to find the old install files. You can find those HERE: Lightburn Past Releases
Step 2: Installing Lightburn and Aurora Drivers
Unlike some software that offers separate versions for different types of lasers, Lightburn is a single program that can work with both Gantry (motion-based) and Galvo (scanner-based) laser systems. However, the features you can access depend on the type of license you purchase:
Lightburn Core – This is the base license designed for hobbyists and general users. It supports GCode-based controllers (such as GRBL and Smoothieware) and basic laser functions. It’s best suited for diode and entry-level CO2 lasers. You may already have this if you’re upgrading from diode lasers
Lightburn Pro – THIS IS WHAT YOU NEED – This license unlocks support for more advanced controllers, including DSP-based CO2 laser systems (Ruida, Trocen, etc.) and high-speed Galvo fiber lasers used for metal engraving. It also includes additional features tailored for professional and industrial applications.
You will need to go to Lightburn’s webpage and grab the installer file if you do not already have a copy. You can download and use a trial version of Lightburn for 30 days before needing to input a License Key. This version of lightburn will have all the same features as the full version
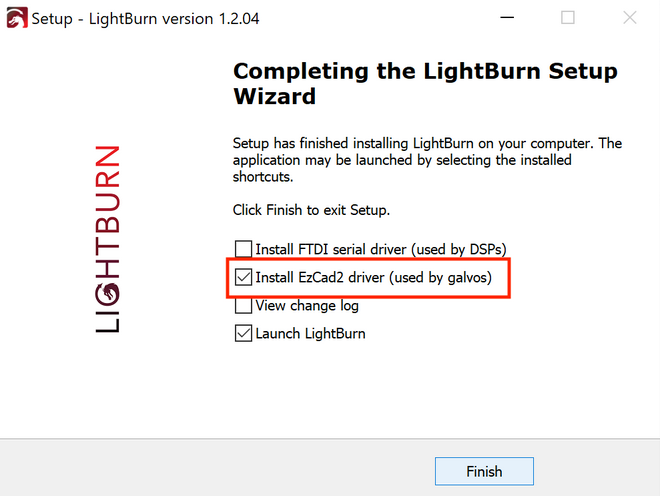
Run the Installer, including EzCad Drivers
You can run the installer and set up LightBurn in a suitable location on your computer. However, don’t just click through the screens too quickly! Near the end, you’ll come across THIS screen, which prompts you to install specific drivers. Be sure to select the EzCad driver before proceeding – this is essential for Lightburn to communicate with your laser.
NOTE: If you’re using a MAC, you won’t be given this prompt screen and can skip to Step 3.
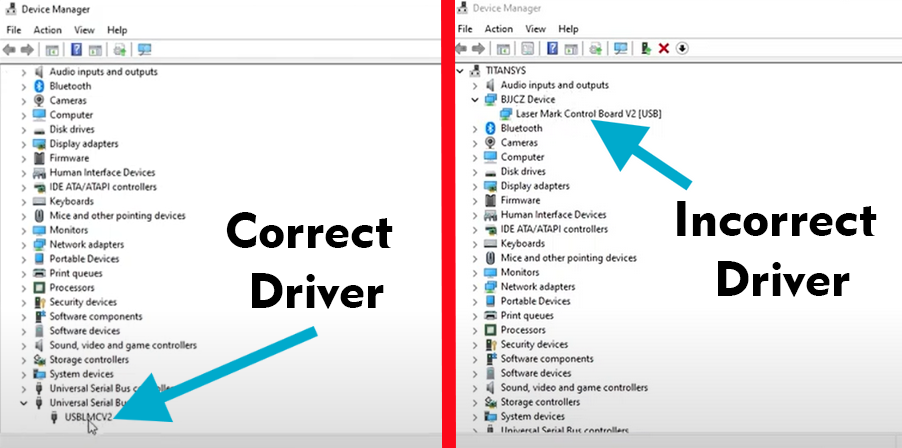
Check your Install
Once the installation is complete, it’s a good idea to check that your computer recognizes the laser. Connect the laser to your computer using the provided USB cable—Windows should play the ‘device connected’ chime. Next, open your computer settings and go to the Windows Device Manager. Look through the list and confirm that you see a USBLMCV# device under ‘Universal Serial Bus Devices’. If you can see this, move on to Step 3.
If you don’t see it – or you see the BJJCZ Device on your list – don’t worry (that’s just the Aurora’s native EzCad driver. There are ways to swap between the two. For more info on that, refer to this article:
Thunder Laser Aurora Windows Driver for Lightburn Problems
Step 3: Importing the .LBDev Configuration File
You may have seen in some “Aurora Setup” videos that the process is a bit more involved than setting up a CO₂ laser in Lightburn. Galvo lasers require a bit more fine-tuning to work properly. Luckily, Thunder Laser has created a convenient Lightburn Device Profile (LBDev) that automatically imports these fine-tuned settings. This saves you time and helps ensure no mistakes are made. Then, we’ll use a COR file from the USB stick that came with the laser in order to set up your lens.
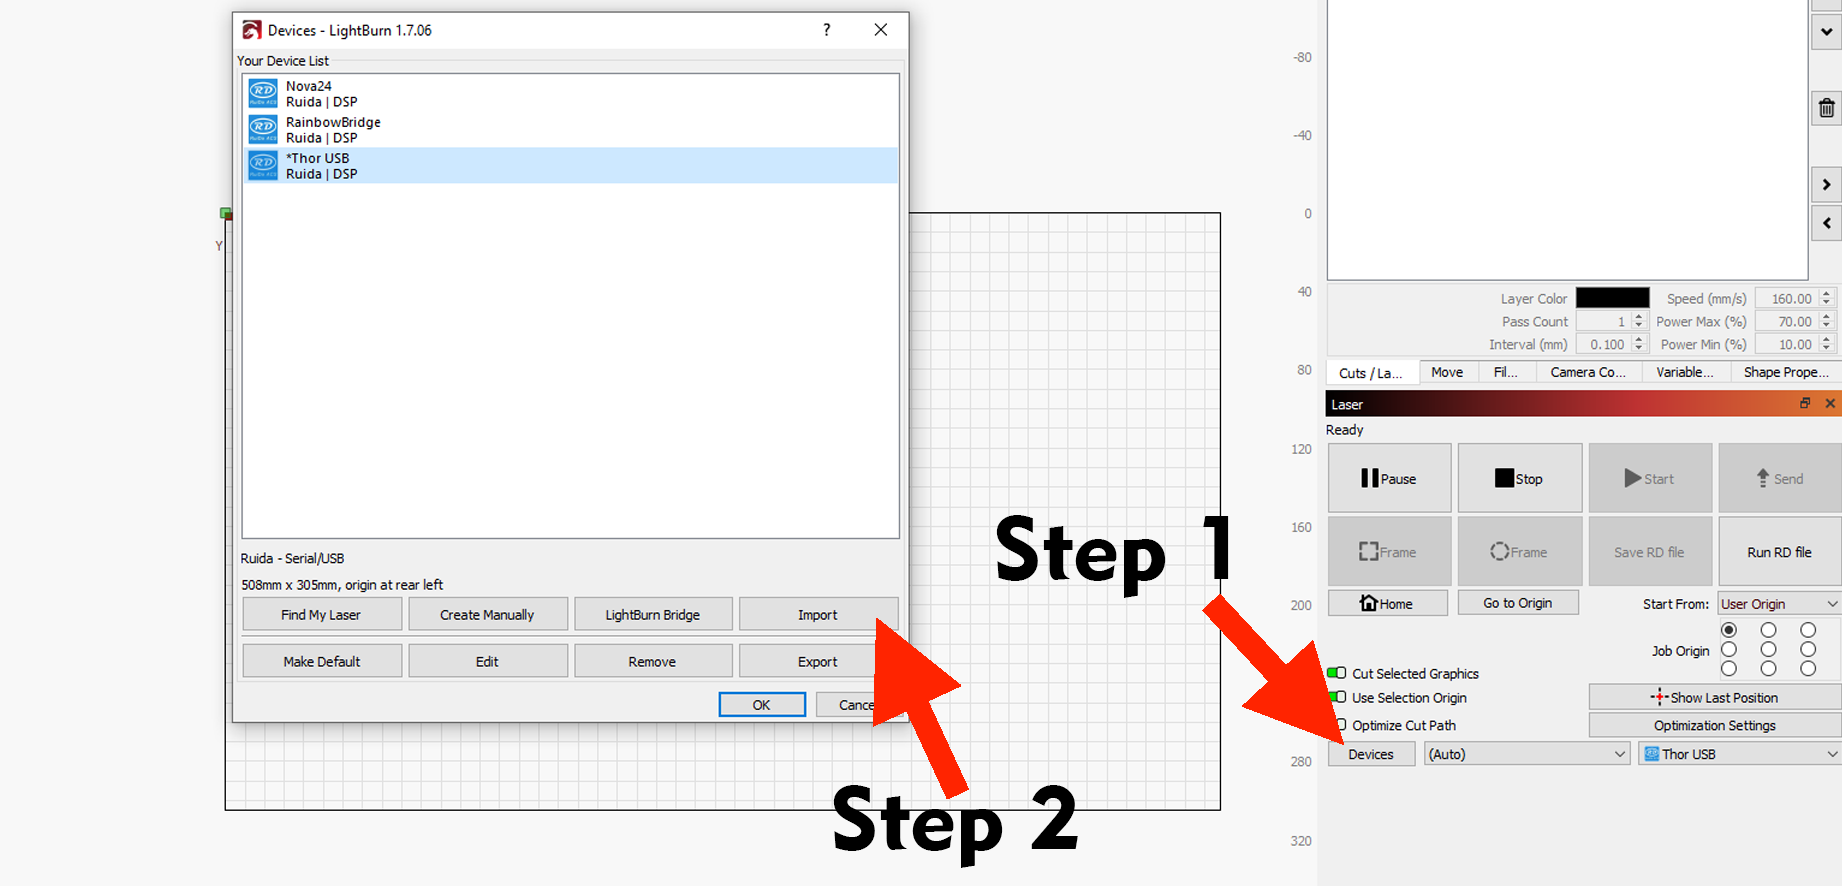
Begin by clicking on the DEVICES button in the laser tab window to open up available lasers. Instead of clicking ‘Find My Laser’ like for CO2 lasers, click the ‘Import’ button (Note: If this is your first laser, this Devices window will open as soon as you start up Lightburn)
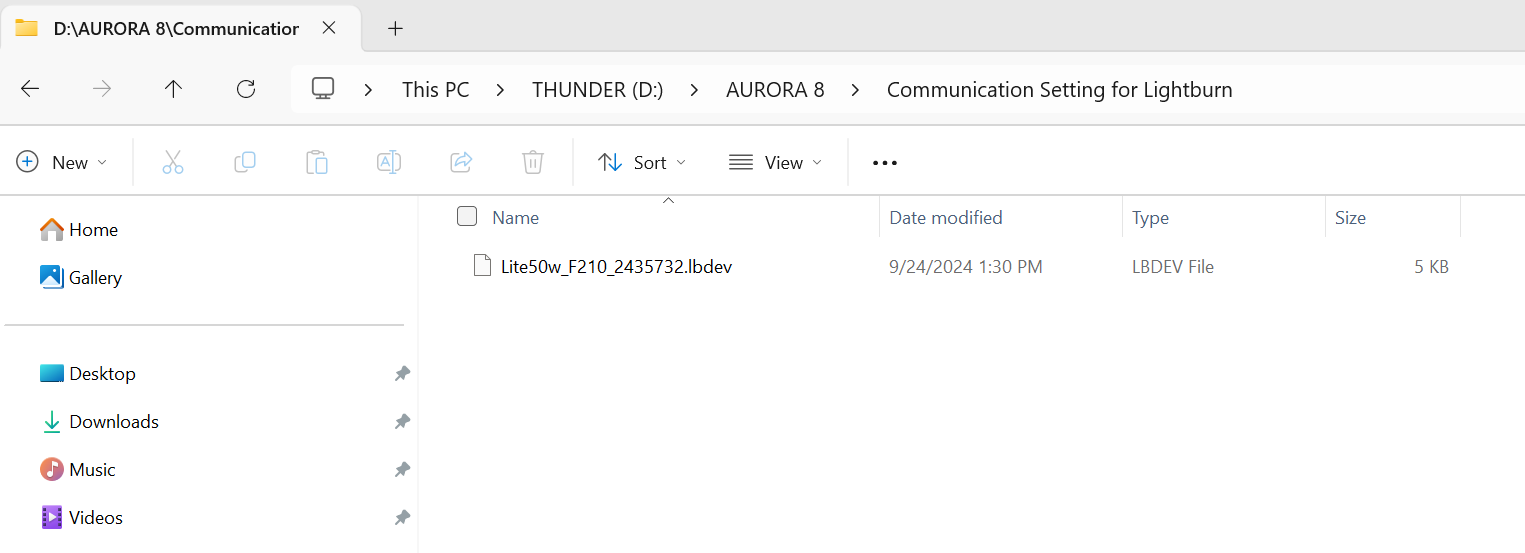
Insert your Thunder Laser USB stick (from your toolbag) into your computer, open the Aurora 8 folder, and then navigate to the Communication Settings for Lightburn folder inside that one.
In this folder, you’ll see a ***.lbdev file. Clicking on it will import the device profile into Lightburn
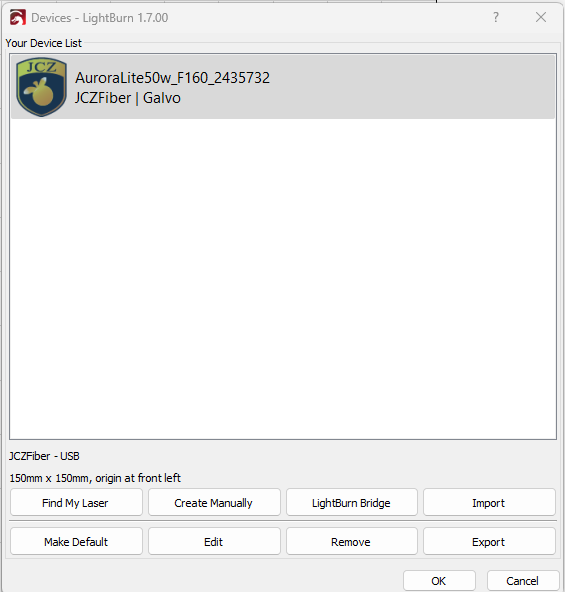
You can confirm the file was loaded properly by checking the information in the Devices screen now. You should see your laser, and in the name, you should also see your lens size and serial number
You can also confirm by opening up the Device Settings menu and seeing that these menus have been filled out with values
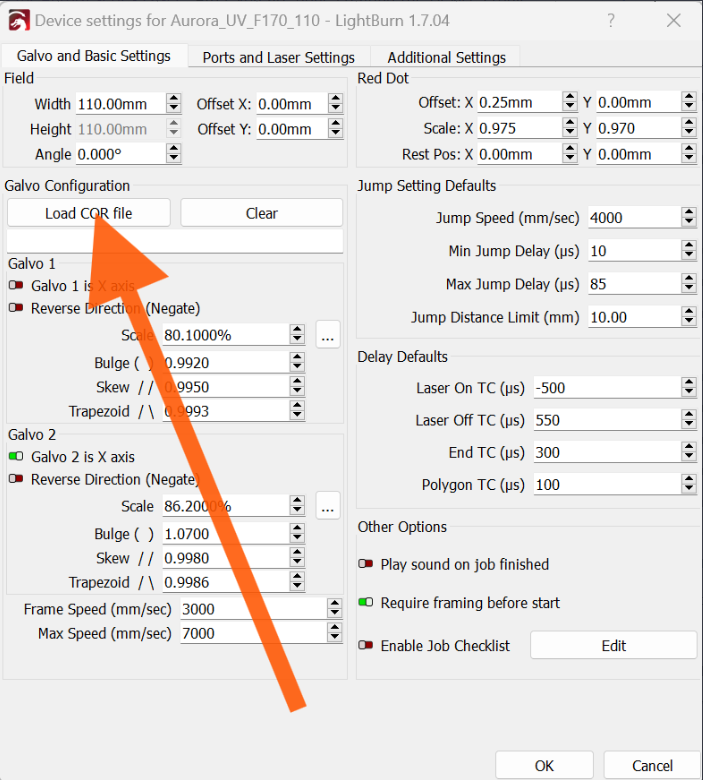
Now you just need to install the .COR (correction) file to properly set the values for your lens, and we can do that from this menu
Installing the .COR file
In your Device Settings menu, you should see a field for Galvo Configuration. Click the Load COR File button, and navigate through your USB stick again to the Aurora 8 Folder.
This time, open the Fiber Software folder, and inside it, the Correction File folder. You should be presented with three options, and you’ll need to select the one that applies to the lens you have installed
The numbering on the file is referring to the marking area size, rather than the lens size, so use the table below to select the right file for your lens
Lens Model
Marking Area (mm)
Marking Area (inches)
F-160
110 × 110
4.3″ × 4.3″
F-210
150 × 150
5.9″ × 5.9″
F-290
200 × 200
7.9″ × 7.9″
If you need help identifying which lens you have, check out this article for assistance:
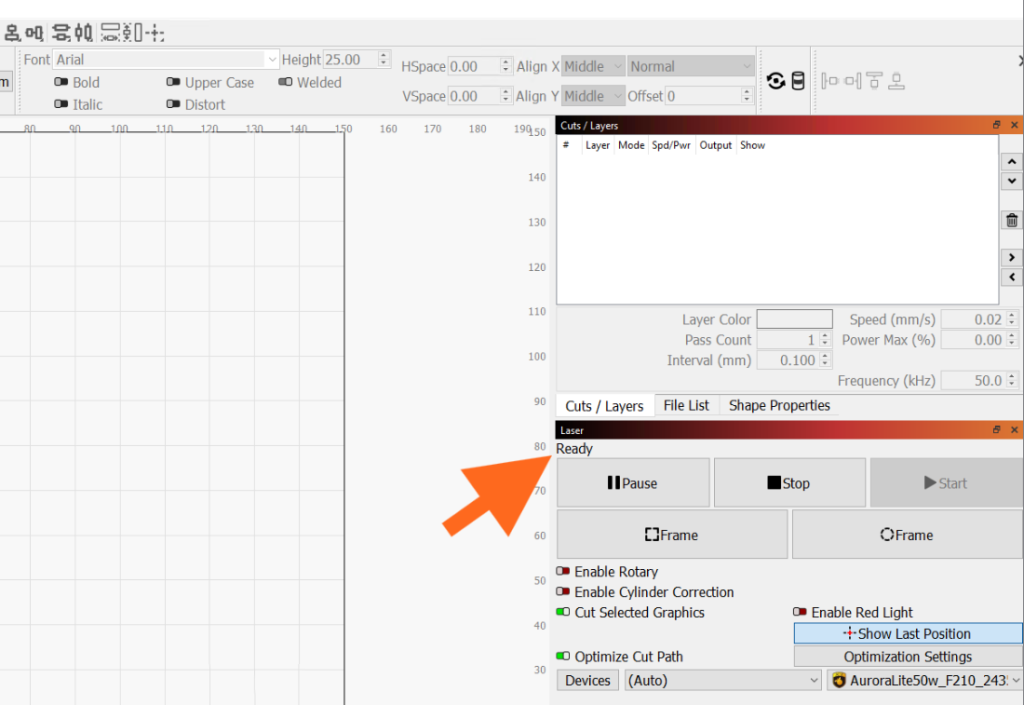
Once you’ve installed the .LBDev and .COR files, your Aurora should be good to go! You can confirm that you laser is connected by opening up the Laser tab in Lightburn, and checking to see if theres a READY message above the Pause, Stop, and Start Buttons
If you see this message, you’re ready to get started with your laser projects. If not, there may be an issue at any of these Steps along the way. We would recommend uninstalling and trying the process again, as well as opening a ticket with
support@thunderlaser.ca, and we’d be more than happy to help you figure out what has gone wrong.
Step 5: Creating Additional Profiles for Each Lens
If you’ve picked up multiple lenses for your Aurora, it’s a good idea to create a separate laser profile for each one. Each lens has slightly different settings in the COR file, and having dedicated profiles means you can easily switch between them without adjusting everything manually each time.
The best part? Setting up these profiles is quick and easy—just a minute or two per lens. All you need to do is select the lens, dial in the right settings, and save it as a new profile. After that, swapping lenses is as simple as choosing the right profile and getting to work.
Taking a little time to set this up now will save you a lot of hassle later, keeping your projects running smoothly and efficiently.
Duplicate your Existing Fiber Laser and Rename it
To set up a new lens profile, click the DEVICES button in the Laser tab—just like you did for your first lens. This time, there’s no need to go through the process of adding a new laser. Simply right-click on your Aurora Fiber Laser in the list and select Duplicate
The screen will then ask you to select the laser type from the list—choose JCZFiber. And then on the following screen, you can rename the profile to something easier to recognize. For clarity, make sure to include the lens size in the name (like “Aurora 160mm” or “Aurora 210mm”). This makes it easy to know which profile to select when switching lenses.
Installing the .COR file on the new Profile
Since you’ve already loaded a .COR file for your first lens, this will be a breeze. While in the new lens profile you created, head to the Device Settings menu, click Load COR File, and navigate through your USB stick to the Aurora 8 folder. Then, open the Fiber Software folder, and inside that, the Correction File folder.
Remember, the file names are based on the marking area size, not the lens size. Use the table back in Step 4 to pick the right file for your lens. If you’re unsure which lens you have, check out the linked article in that step for some quick tips.
And with that done, you’ now have multiple profiles set up in Lightburn that you can quick swap between whenever you need to change your lens

.png "laser cutter Globle") International
International
 United States
 Brasil
 Canada
 Česká
Česká
 Ελλάδα
 Polska
 Ireland
 Portugal
 Lietuva
 Россия
 Deutschland
 Britain
 Україна
 France
 Sverige
 한국
한국
 中国
中国
 ประเทศไทย
 香港
香港
 Israel
 臺灣
臺灣
 India
India
 Australia
 New Zealand
 South Africa